# Video tutorials
## Modding basics
To get you started with modding for Teardown, we've created a series of videos covering the basics. In this series Emil goes through the different types of Teardown mods, the editor, and the different nodes available in the editor. You will also get some fundamental tips and tricks on how to work more structured with your project as it grows.
Number | Video | Length
------ | ------|--------
1 | An introduction to Teardown mods | 5:36
2 | Editor overview | 5:46
3 | Creating your first scene | 7:19
4 | Adding content to your scene | 5:23
5 | Working more structured | 9:11
6 | Working with Layers and Bodies | 5:48
7 | Working with Ropes | 4:39
8 | Ball and Hinge joints | 11:49
9 | Prismatic joints | 6:43
10 | Lights, Environment and Post-Processing | 8:39
11 | Advanced scene management | 4:38
12 | Instances Screens Scripts Triggers and Locations | 8:19
## Scripting Video Tutorials
Below is a playlist of 10 videos covering the basics of scripting for Teardown.
Number | Video | Length
------ | ------|--------
1 | Scripting Basics | 2:52
2 | Entities and Handles | 3:28
3 | Input and Interaction | 2:54
4 | Vector Math | 3:49
5 | Bodies and Shapes | 2:57
6 | User Interface | 3:24
7 | Multiple scripts and the registry | 2:51
8 | Scene queries | 2:58
9 | Sprites, sound and particles | 3:17
10 | Advanced topics | 3:56
# Quick start
## Launch the editor
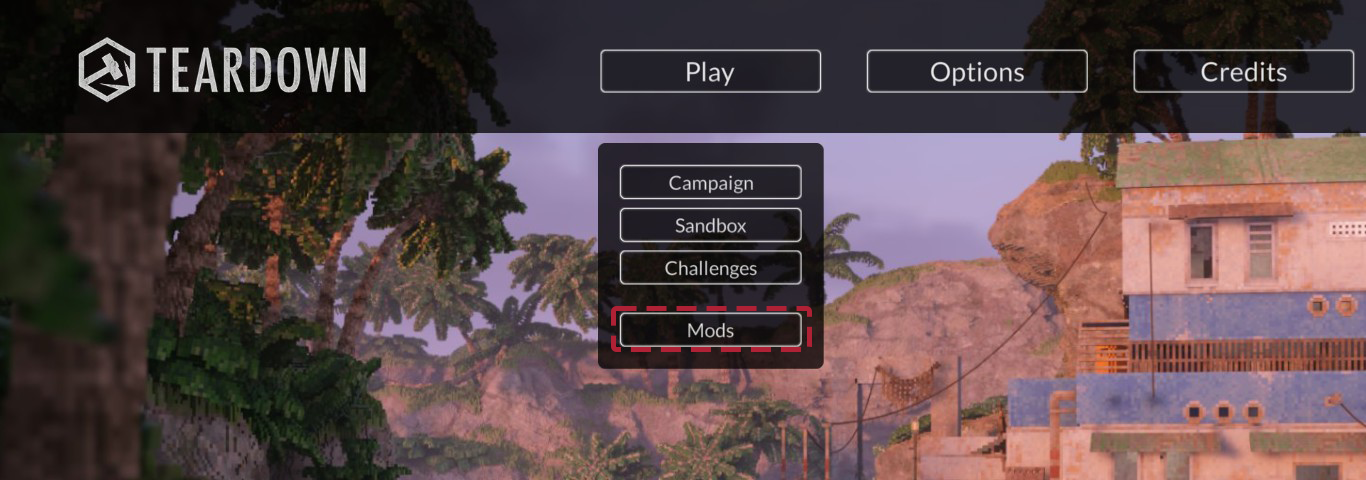
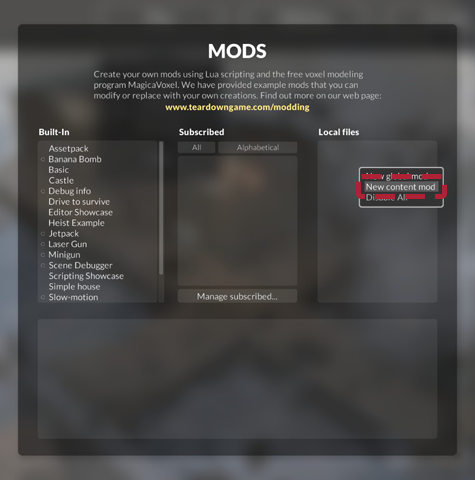
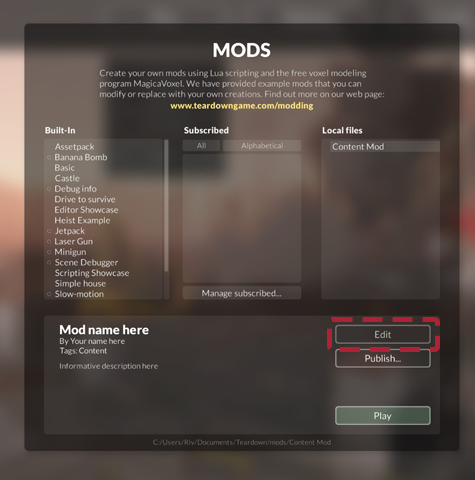
From the start menu press Play → Mods, right click in the local files pane, select New content mod, select the new content mod in the local files pane and press edit to launch the editor.
Once in the editor press F5 to start you level and press F4 to return to the editor.

## Publish your mod
To publish your mod fill out the information in info.txt in your mod folder and add a file named preview.jpg (max file size 1mb), then select your mod in the local files pane and press Publish.
## Scripting API
The Teardown Lua API reference can be found [here](api.html).
# Modding
Teardown comes with a level editor, scripting support and a mod manager.
Mods in Teardown are managed using The Mod Manager that is accessed from within the game main menu.
It allows for a simple, yet powerful, way to enable, edit and play Teardown mods.
The Mod Manager also have Steam Workshop integration enabling publishing and subscribing to Workshop mods directly from the game.
## Mod Types
There are two kind of mods that can be implemented for Teardown; **Global mods** and **Content mods**.
**Global mods** are mods which have an effect during all gameplay in the game. When enabled, they are active during all gameplay in Teardown, whether that's the Campaign, Sandbox or other people's Content mods. All enabled Global mods are also listed on the the loading screen when loading an environment or a mission.
**Content mods** are mods which contains playable environments, such as custom sandbox environments or environments with missions. Unlike **Global mods** the **Content mods** can be played as their own experiences, and they do not have an effect when playing other content, such as Sandbox environments or the campaign. Unlike Global mods, a Content mod must have a *main.xml* file containing the level data for the mod. A play button is shown in the info pane when a Content mod is selected in the Mod manager. Clicking the **Play** button loads and starts the mod.
## Built-In Mods
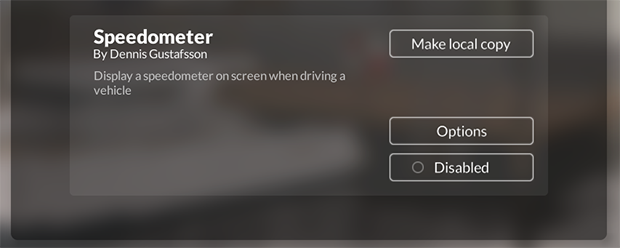
The game comes with a couple of built-in global and content mods ready to be used. The built in mods are useful when familiarizing yourself with the editor and scripting or simply as a template for your own mod. The built-in mods can be played or enabled just like any other mods with the exception that they cannot be edited. To edit a built in mod you first need to make a local copy of it. This is done by selecting a built in mod in the Mod manager and clicking the **Make local copy** button. This creates a local copy of the mod in your *"Documents/Teardown/mods"* folder that can be edited without the risk of breaking any game files.
## Steam Workshop
The easiest way to get new mods for Teardown is from the Steam Workshop.
The Workshop can be accessed directly from the Mod Manager by clicking the "Manage subscribed..." button.
This opens the Workshop page in the Steam Client where you can view and subscribe to community mods.
When you subscribe the mod is automatically added to the "Subscribed" list in the Mod Manager.
You can use the mod directly from the subscribed window or you can make a local copy of the mod using the "Make local copy" button.

You can also publish mods to Steam Workshop from the Mod Manager.
Select the mod you want to publish in the "Local Files" window and click the "Publish" button.
The Mod Manager will use the content in the mod [info.txt](#info.txt) file to populate the title, description and Workshop tags.
You also need to have a **preview.jpg** image file in the mod folder. This image will be used as the mod thumbnail in the Workshop.
Clicking the "Publish" button will upload the mod to the Workshop.
When the mod is published for the first time the file id.txt is created in the mod folder.
The file stores the mod Steam item ID and is used when updating the mod.
Updating a mod is done in the same way as the initial upload but the text on the button now reads "Publish update".
## Building a Mod
A Teardown mod is a single Windows folder where all the files needed by the mod are stored. A mod folder typically contains a text file with information about the mod, script files that extend or override game play, editor XML files with the level environment information plus all the other resources used by the mod such as vox, image and sound files.
```
"My Documents"
├── Teardown
├── Mods
├── MyMod1 # Custom mod 1
├── info.txt # Mod info
├── main.lua # Mod main lua script
├── main.xml # Content mod main XML file
├── mylevel2.xml # Content mod XML file
├── options.lua # Mod options
├── preview.jpg # Steam Workshop thumbnail image
├── images # Image resources
├── scripts # Mod Lua scripts
├── sound # Sound resources
├── vox # Vox files
| └── bench.vox # Mod specific vox file(s)
└── ...
├── MyMod2 # Custom mod 2
└── ...
```
Please take care to only use Latin alphanumerical characters (a-z 0-9 and space) as the game might otherwise have issues loading your mod. You can choose your own directory structure within the mod but *info.txt*, *main.xml*, *main.lua*, *options.lua* and *preview.jpg* should always be placed in the mod root folder.
#### info.txt
All mods need a info.txt file. This file contains the name of the mod, the name of the author, and a short description of the mod.
The tags key is an optional comma separated list of tags used to categorize the mod in the Steam Workshop.
Valid tags are: **Map, Gameplay, Asset, Vehicle, Tool**.
```markdown
name = Laser Gun
author = Tuxedo Labs
description = Custom tool example mod. Laser gun that cuts through most materials
tags = Tool
```
This is the full contents of the *info.txt* file for the Laser Gun mod. This information is shown when a mod is selected in the **Mod manager**.
#### main.xml
If the mod has a *main.xml* file, the game will classify the mod as a Content mod. The *main.xml* file contains the level data for the environment in the mod. In the *main.xml* file (and all xml-files for levels) the keyword **MOD** is used as a reference to the mods folder. For example, if you are using a vox file in your *main.xml*:
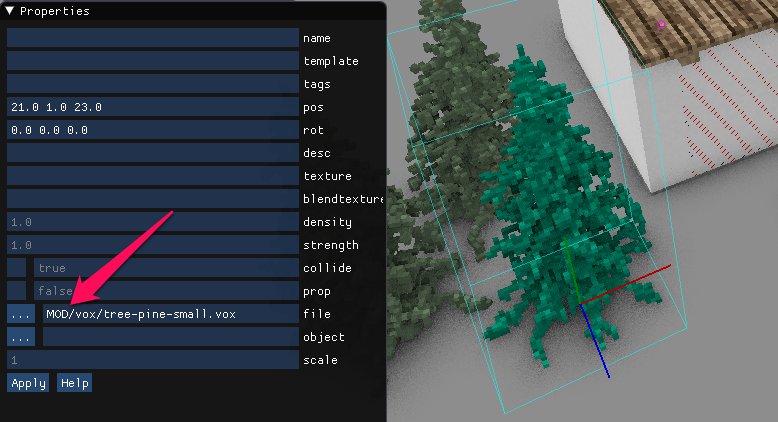
The above path would point to the voxel file *tree-pine-small.vox* in the vox folder you created for your mod.
#### main.lua
Any *main.lua* file in your mods folder will be run whenever your mod is active. For Global mods, whenever the game is played and the mod is enabled, or for Content mods, whenever that mod is played. See chapter [Scripting](#Scripting) for more info on scripting with Lua in Teardown
#### options.lua
If the mod has an *options.lua* file, an **Options** button will be shown when the mod is selected in the Mod manager.
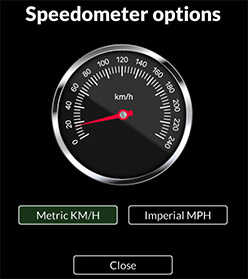
When the Options button is clicked, the game will run the *options.lua* file in the mods folder. The *options.lua* file should contain a `draw()` function, containing the code for the options screen. Take a look at the *options.lua* file in the Speedometer mod to start getting an insight into how this is done.
#### main.lua (from base game)
To equip the player with the same tools they have unlocked and upgraded in the main game, include the main.lua script from the main game.
#### spawn.txt
This is an optional file that is used for exporting prefabs as [spawnable assets](#Modding/spawnableassets)
## Default Content Replacement
Mods can replace the default content of the game by replicating the data structure of the games "data" folder. For example, to replace the model for the pipebomb, put your vox model in the "*data\vox\pipebomb.vox*" folder in your mod folder.

Now this vox model will replace the default model for the thrown pipebomb whenever your mod is played, or, if it is an enabled Global mod, whenever the game is played at all.
The banana *pipebomb.vox* can be downloaded [here](downloadable/pipebomb.vox).
Sound effects and music in Teardown is using the .ogg audio format. Each song and sound effect is available as an individual file in the game file structure. Due to licensing reasons all .ogg audio files that comes with Teardown have been encrypted into .tde files that can only be read by the game. It is possible to override an encrypted .tde files by adding a new .ogg file with the same filename (excluding the .tde extension) to the same directory. The game will automatically load the file with the expected name and the .ogg extension prior to loading a file with the .tde extension.
## Custom Tools
It is possible to add custom Tools to the player inventory.
This is done using the [`RegisterTool()`](api.html#RegisterTool) Lua function.
```lua
--Register tool and enable it
RegisterTool("lasergun", "Laser Gun", "MOD/vox/lasergun.vox")
SetBool("game.tool.lasergun.enabled", true)
```
Take a look at the script for the "Laser Gun" built-in mod for more details how to include you own custom tools (or weapons) in Teardown.
## Spawnable assets
When making a mod you can choose to export assets that become available through the built-in spawn menu. In order to export an asset, you must first convert it to a prefab, so the asset has a separate XML file. Check the [prefabs](#Editor/Prefabs) section of editor documentation for details. Note that static objects will be converted to dynamic when using the built-in spawn menu.
Once you have the prefab file, you can list it in the spawn.txt text file in your mod folder. Create the text file if it does not already exist and add one line for each spawnable prefab in the following format:
```txt
path/to/mycar.xml : Cars/My car
```
This will export the prefab so that it becomes available in the built in spawn menu as "My car" under the "Cars" category. The path is relative you mod root folder, so if your mod folder is **Documents/Teardown/mods/mymod**, the prefab file in the above example should be in **Documents/Teardown/mods/mymod/path/to/mycar.xml**
## Multi-Scene mods
A Content mod in Teardown always implement at least one playable level in the *main.xml* file. The mod may also implement additional levels that can be loaded at run-time. Each level is implemented a separate XML file using the [Editor](#Editor). When a user clicks the "Play" button in the The Mod Manager the game loads the *main.xml* and invokes the *main.lua* script. Loading a different level from within the Mod is done with the script API function`StartLevel()`
```lua
-- Load level 2
StartLevel("level2", "MOD/mymodlevel2.xml")
```
# Editor
The Teardown Editor is used to create and modify playable levels for Teardown content mods. Open the Editor from the Mod Manager in the game. Select a Content mod from the "Local Files" pane and click the "Edit" button to open the Editor and load the mod *main.xml* file.

If you want to edit a different level simply go to File → Open in the Editor and select the XML file for that level.
## File paths
Paths in the editor uses two keywords, MOD and LEVEL, to reference context specific paths when working with mods.
**MOD** references the root folder of the current mod.
**LEVEL** references the folder with the same name as the currently open XML file. The folder and the xml file must be in the same folder in the hierarchy.
```
"My Documents"
├── Teardown
├── Mods
├── MyMod1 # MOD references this folder
├── main.xml # Content mod main XML file
├── mylevel2.xml # Content mod XML file
├── mythirdlevel.xml # Content mod XML file
├── main # LEVEL references this folder IF the main.xml is open in the editor
| └── ...
├── mylevel2 # LEVEL references this folder IF the mylevel2.xml is open in the editor
| └── ...
├── mythirdlevel # LEVEL references this folder IF the mythirdlevel.xml is open in the editor
| └── ...
└── ...
```
## Built In Help System
The Editor has a built-in Help system that describes both the Editor itself and how to work with the functionality that the editor offers. This page is not a comprehensive reference to the Editor. The Editor is continuously updated with new functionality and the best place to find current and correct information is from the built-in Help system. The built in help-system can be opened by choosing "Help" in the menu.
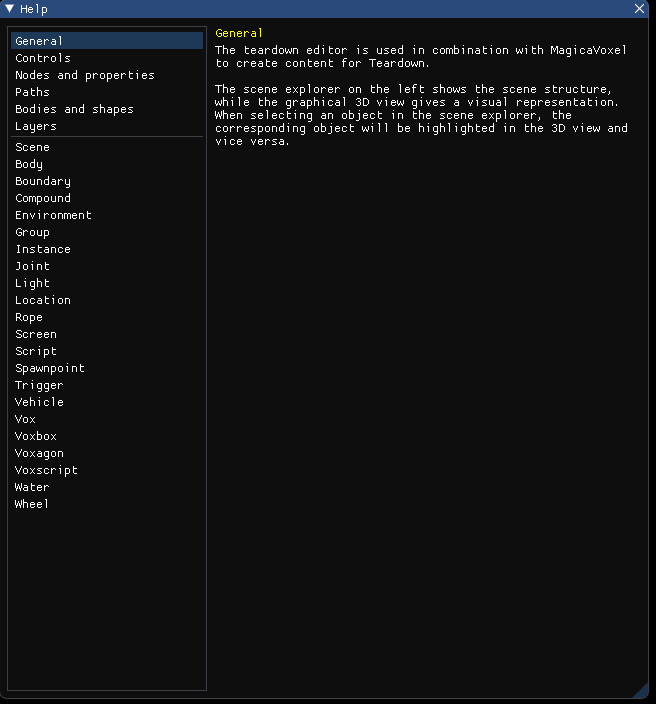
The Help window can be moved as any other window in the editor and can remain open while working on a level. In addition to the Help window the Teardown Editor gives you context specific information when you hover the mouse pointer over a property. This feature is extremely useful and sometimes the only place where you can find information about a particular property.
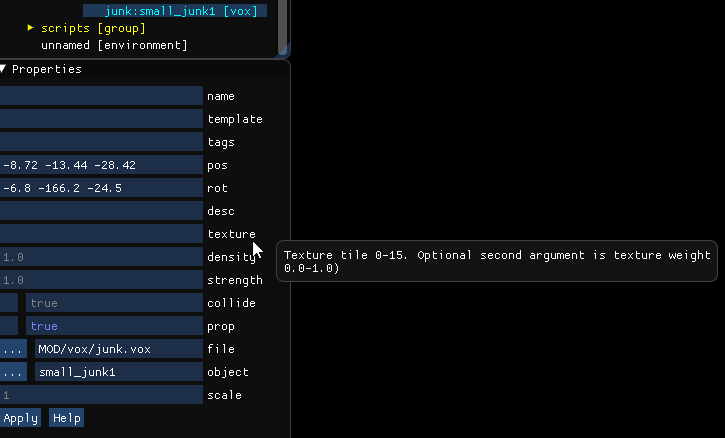
The image above shows the context specific info on the texture property for the *small_junk1* object in the Editor.
## Scene Explorer
The Scene Explorer lists all the objects in the level. The content is shown in the same order as they exist in the level XML file. Every object in the Scene Explorer is also represented in the 3D view. Selecting an object in the Scene Explorer also selects the object on the 3D view and vice versa. New objects can be added by right clicking in the Scene Explorer and choosing the "new" option
## Groups
Even a simple level may contain hundreds of different objects. Having everything in the scene root will quickly make it nearly impossible to keep track of all the objects. As a help to organize objects you can create Groups in the Scene Explorer to categorize and group items according to your own liking. Besides making the Scene Explorer a bit less messy, Groups are also used together with layers when creating different variants of a level (see chapter [Layers](#layers)). Create a group by right-clicking in the Scene Explorer and select new → Group.

A basic example of how Groups are used to organize objects can be seen in the "Simple House" built-in mode
## Prefabs
If you right-click a group in the scene explorer, you can convert it to a prefab. This will save out the group as a separate XML file, and you can then place multiple copies of the same prefab in the level using instances. This is often very convenient for building reusable assets. If you convert an instance back to a group, change it and then commit those changes, it will affect all instances using the same prefab.
Prefabs are also used for exporting [spawnable assets](#modding/Spawnableassets)
## Property Window
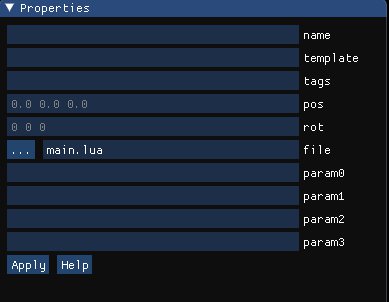
The Property Window shows all valid properties for the specific type of object currently selected in the Scene Explorer. The image below shows the property for one of the joints to the door in the built in "Simple House" mod. Some properties are automatically updated when the object is manipulated (moved, rotated, resized) in the 3D-view. Not all properties are required to have a value. Properties that require a value usually have a default value. The default value can be overridden by entering a new value in the property window.

Different highlighting is used to indicate the properties of that particular property. Properties that are explicitly set for the joint in the example above are listed with white letters (*pos, rot, type, size, limits*). Properties that are using their default values are shown in grey letters (*collide, sound*). Properties that are [inherited](#editor/hierarchy&inheritance) by a parent are shown in blue letters (*rotstrength, rotspring*). Optional properties that are not set are listed with no contents in the properties window (*name, template, tags*).
## Tags
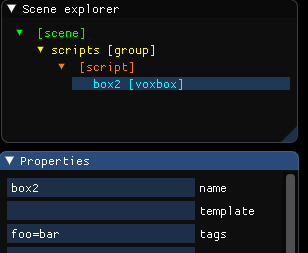
Every object in the editor can have zero, one or more tags associated with it. The tag property is frequently used when scripting in Teardown. Several of the Teardown API functions allows enumerating objects in the scene using the tag name. You may for example want to tag all shapes in a scene that have the tag `foo`.

Tagging the object with `foo` makes it possible to find all tagged shapes in the scene during runtime using the API function `FindShapes()`
```lua
list = FindShapes("foo", true)
-- list will contain [box2]
```
Tags can also be assigned a value that can be read from a script.
```lua
handle = FindShape("foo")
value = GetTagValue(handle, "foo")
-- value will be "bar"
```
#### Built-in Tags
Teardown defines a couple of built-in tags for objects in the Editor that can be used to alter the default object behavior. The tags are listed as context-specific help for the Object 'tag' property in the Property Window.
## Hierarchy & Inheritance
All level content is stored as standard XML meaning that everything in the file is a hierarchy of node objects. The structure of the nodes in the file is directly mapped to the view in the Scene Explorer. Teardown implement support for property inheritance in the Editor. Child nodes will inherit the properties of their parent unless the property is explicitly set for the child. Inheritance allows you to put objects you want to share a common property inside of Groups and then set the property only once on the Group node. All the objects within the group will inherit the properties of the Group itself. This makes Groups useful not only as a way to keep the Scene Explorer tidy but as a way to logically group objects with similar properties.
Hierarchy is also relevant when searching for objects using the API functions in scripts. Functions that allows scripts to "find" objects will by default only return objects matching the search criteria below the script in the hierarchy. When a script wants to find all objects in the scene matching the search criteria regardless of position in the hierarchy the "find" function can be called with an optional "global" parameter.
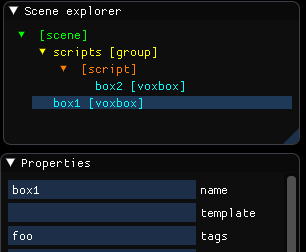
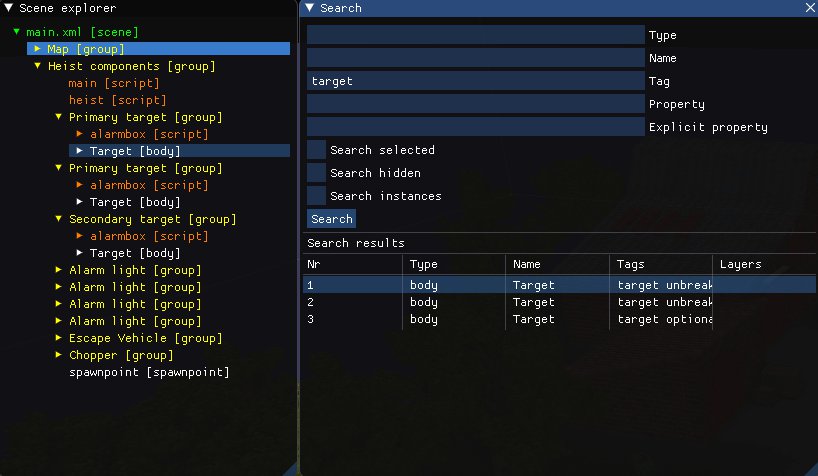
The scene above shows two voxbox shapes, "box1" and "box2", both having the `foo` tag. The API has a function `FindShapes()` that allows the script to find shapes using a tag as search criteria.
```lua
list = FindShapes("target")
-- returns "box2"
```
When `FindShapes()` is called from the script the function will only return "box2" as "box1" is above the script in the hierarchy.
```lua
list = FindShapes("target", true)
-- returns ["box2", "box1"]
```
Calling `FindShapes()` with a second optional parameter indicating a global search will return all shapes with the "foo" tag, regardless of their place in the hierarchy.
## Layers
Layers in the Editor is a feature that can be used to create multiple variants of the same level. A [Group](#groups) can be configured to only show up for a particular layer. A level can be run with no or with any combination of enabled layers to provide different types of gameplay. Create a layer by editing the "layer" property on a Group. The layer will automatically occur in the Layers Window in the Editor. You can choose to disable or enable any combination of layers by clicking the layers in the Window. When the level is played from the Editor File → Play all enabled layers in the Layers Window are loaded. Disabling a Layer in the Editor will hide that particular group from the Scene Explorer. When a Group is hidden in the "Layers" window the objects within the Group are hidden in the 3D view as well.
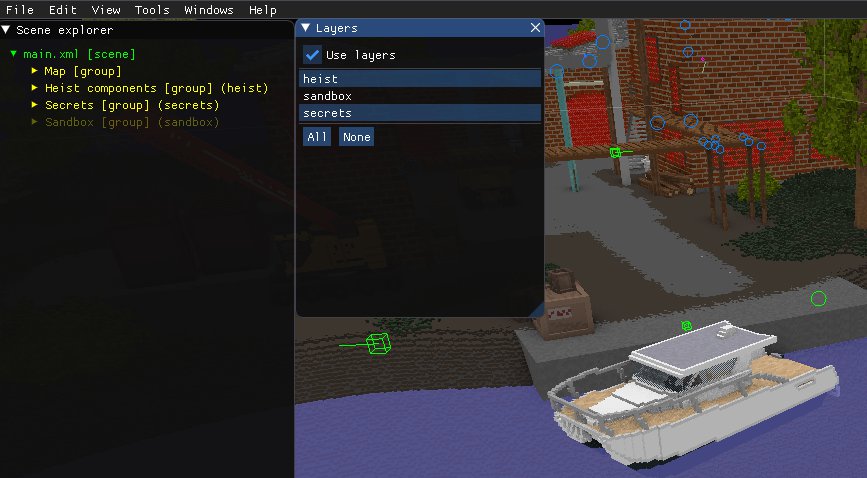
The image above shows the layers "heist" and "secrets" as enabled and "sandbox" as disabled. The disabled "sandbox" layer is muted in the Scene Explorer and hidden from the 3D view to reduce clutter, press V to toggle the visiblilty of hidden layers in the 3D view. It is possible to choose which layers to enable when loading a level from a script with `StartLevel()`
```lua
-- Load level 2 with Layers 'heist' and 'secrets' active
StartLevel("level2", "MOD/mymodlevel2.xml", "heist secrets")
```
```lua
-- Load level 2 with Layer 'sandbox' active
StartLevel("level2", "MOD/mymodlevel2.xml", "sandbox")
```
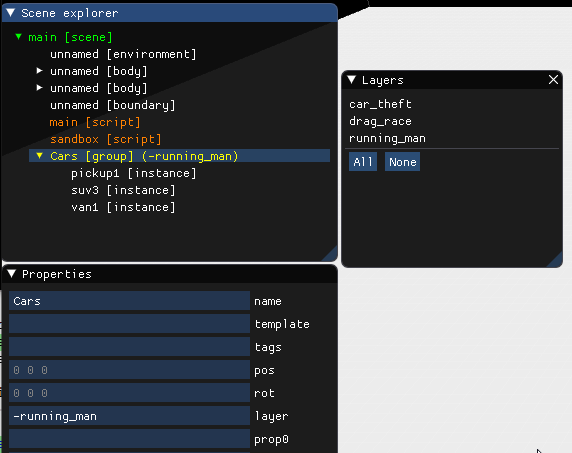
It is also possible to disable Groups for specific layers. The image below show a Content Mod that implement three missions as three different layers (car_theft, drag_race, running_man). The level has put all the car objects in a group called "Cars". The "Cars" Group is not a layer on it's own and is visible by default for all layers. Let's say that the mission "running_man" should be played without cars. By using a "minus layer" the "Cars" group can be excluded when a specific layer is loaded. A "minus layer" is the name of the layer to be excluded from prefixed with a "-" character. Adding "-running_man" to the Car Group will exclude all objects from that Group when the "running_man" layer is loaded.
## Search Window
Press (**CTRL-F**) to open the search window that can be used to find objects in the scene given a specific tag or property etc.
# Modelling for Teardown
## MagicaVoxel
Almost all assets used in Teardown was modeled in the free voxel editor MagicaVoxel. MagicaVoxel can be downloaded [here](https://ephtracy.github.io/). Teardown have been tested with models created in MagicaVoxel up to version 0.99.6.4. This documentation covers MagicaVoxel 0.99.6.2. While we can't teach you how to use MagicaVoxel, there are a few concepts and some tips on how to create assets that work well with Teardown.
## Palette Indices
In MagicaVoxel the palette is made up of 255 indexed colors. This means each color slot has a index number according to its position in the palette. These indices are used in Teardown to decide what material any individual voxel is made of.
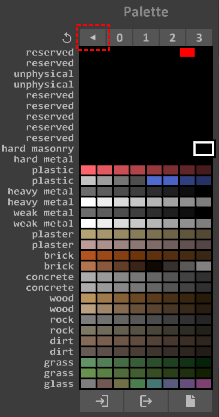
Observe that the actual color (whether its green, blue, white, or any other color) doesn't matter. Only the position in the palette is important from a material perspective. For example, the color at index 9 is always grass, no matter what actual color it is. You can see what index a particular color position has by hovering over it. The index will be shown in the console at the bottom of the screen.

To assist with materials, we are providing a MagicaVoxel file which has the palette annotated with the material names next to the colors. The palette can be downloaded [here](downloadable/teardown_palette.vox). If you can't see the material names when you open the file, click the little arrow button at the top of the palette (marked with a red outline in the image above).
## Object Basics
When you open MagicaVoxel, you are in the edit mode. You can see this because the editing tools are visible to the left of the 3D window in the center. If you press the **TAB** key, the view is switched to the scene mode, which you can see as it now shows 8 layers named 0 -7 to the left of the 3D window.

In edit mode you can make changes to the currently selected object with the various tools. In scene mode you can create, delete and move objects around. New objects are created with the plus button at the top of the window.

Each individual object can be a maximum of 256 * 256 * 256 voxels in size. But you can create more objects to make bigger levels. For performance reasons we recommend that you don't use objects at the maximum size, as it might cause stutters in the game. Objects of half that size in all axis (128 * 128 * 128) are generally OK. Very big but flat objects are also OK., i.e., 256 * 256 * 10.
#### Empty Space in Objects

Objects with a lot of empty space should be divided into several objects. This helps the engine avoid spending time traversing empty space inside objects. The tree above is separated into two objects. One for the crown, and one for the trunk. Thereby eliminating unnecessary empty space around the trunk. Another good example is a house. A house should never be built in one single object. Instead walls and floors should be divided into thinner objects.

In this image, the house to the left is divided into four separate objects, which is the correct way to do it. In the house to the right all walls are built in one single object, creating a lot of unnecessary empty space. Building assets the right way can greatly impact the performance of your levels positively.
#### Object Order
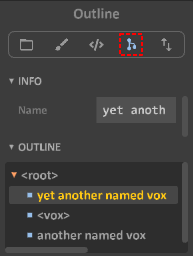
By clicking the "Show Scene Outline" button (marked with a red outline in the image to the right). This shows all the objects in your scene with the most recently created at the top. This is important, because the order in which objects are created matters to how they are imported in the game. Newer objects that overlap older objects replace the voxels in the older object when imported.
An example:
Lets say we have two objects; one is a brick wall and the other is a wood wall. These two objects intersect with each other in the scene. When imported into the game the voxels of the brick wall (which is newer/topmost in the hierarchy) will replace the voxels of the wood wall where they intersect.

The only way to change object order in the hierarchy is to cut (**CTRL-X)** and then paste **(CTRL-V)** it. This retains the objects position in the scene, but moves it to the top of the hierarchy. It is now the newest object in the scene.

There are a couple of things you should know about making assets for Teardown, to make sure your creations work optimally in the game.
#### Voxel Connectivity
For voxels to correctly "stick" together in the game, they need to connect on their sides. Voxels touching only through their edges or corners will not stay together in the game. Such constructions will fall apart the moment the are damaged or otherwise become dynamic in the game.

In the image above, the red/green voxel pairs are incorrectly connected. The blue/purple voxel pair is correctly connected along the voxels sides.
#### Mixing Hard and Soft Materials
Another potential problem is when hard and soft materials are mixed.
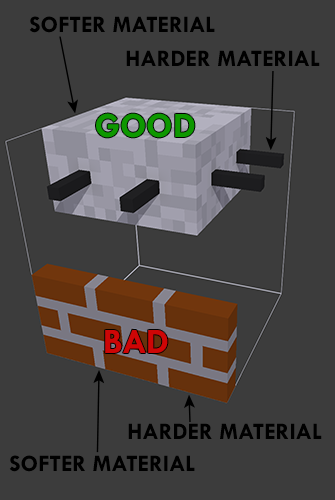
Softer materials should never be placed inside or between harder material as they risk becoming loose and get stuck between the hard surrounding material, causing problems for the physics. Especially in situations where the space available for the softer material is very tight. One example is when making brick walls. It might feel natural to make the grout between the individual bricks in a softer material, like plaster. But this causes issues when the wall is damaged and pieces of the softer plaster is broken and get stuck between the bricks. It is better to also make the grout out of the brick material, but in an appropriately lighter color. Metal rebar in concrete is a good example of the opposite situation, where a harder material is encapsulated by a softer material. As long as the hard material doesn't create pockets of soft material inside hard material.
## Materials
The following is a list of all materials, their respective hardness from softest to hardest, and whether the sledgehammer, blowtorch, explosives and guns (handgun and shotgun) affects them.
| Material | Hardness | Sledge | Blowtorch | Guns | Explosives |
| :----------- | :---------- | :----- | :-------- | :---- | :--------- |
| Glass | Soft | **✓** | **✓** | **✓** | **✓** |
| Grass | Soft | **✓** | **✓** | **✓** | **✓** |
| Dirt | Soft | **✓** | ✗ | **✓** | **✓** |
| Plastic | Soft | **✓** | **✓** | **✓** | **✓** |
| Wood | Soft | **✓** | **✓** | **✓** | **✓** |
| Plaster | Soft | **✓** | ✗ | **✓** | **✓** |
| Concrete | Medium | ✗ | ✗ | **✓** | **✓** |
| Brick | Medium | ✗ | ✗ | **✓** | **✓** |
| Weak Metal | Medium | ✗ | **✓** | **✓** | **✓** |
| Hard Masonry | Hard | ✗ | ✗ | ✗ | **✓** |
| Hard Metal | Hard | ✗ | ✗ | ✗ | **✓** |
| Heavy Metal | Unbreakable | ✗ | ✗ | ✗ | ✗ |
| Rock | Unbreakable | ✗ | ✗ | ✗ | ✗ |
Apart from color and material, voxels can also have properties which define how they are rendered in the game, such as: metal, glass and emissive voxels. To access these settings you need to switch MagicaVoxel to render mode. This is done by pressing the **Render** button on the top left.

Once in **Render** mode a new set of options is shown to the right of the 3D view.

In most cases, a material should be of the type **Metal**, as shown in the image above. The only exceptions being glass and emissive materials. (Diffuse is the same as Metal with max roughness and hence also ok). The roughness value controls how rough contra smooth a surface is. It is very uncommon for materials to have 0 roughness. The metallic value controls how metallic a material is, but also how specular it is. Metallic materials tint the specular color, the highlights in a material. While not exactly correct, you can think of this as reflectivity. At 0 the material is non-reflective, at 100 it is totally reflective. Like a mirror (even though real mirrors are never 100% reflective).
For **Emissive** materials (Emit) we have emission which controls how emissive the material is, and power, which acts like a factor making the emission stronger.
For **Glass** materials the settings are the same as for metallic materials, but the metallic value is replaced by transparency. The transparency value only matters whether it is 100 or not. 100 means non-transparent, and any other value means transparent. The actual value between 0-99 doesn't matter, they are all as transparent. The roughness value has no impact on glass.
Be aware that the appearance of the materials does not match 1:1 between MagicaVoxel and Teardown. For best results, save your project and check it in the game.
#### Understanding the material properties

The different material appearances in Teardown can be described as dull metal, shiny metal, diffuse, emissive and glass, as shown in the image above. Observe that the material appearance doesn't affect what material Teardown assigns to a voxel. An object made of colors in the wood group (indices 57 - 72) will still be wood in the game, even if you make it look like metal.
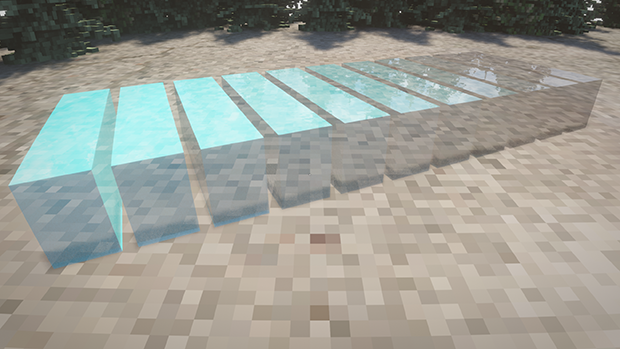
#### Roughness
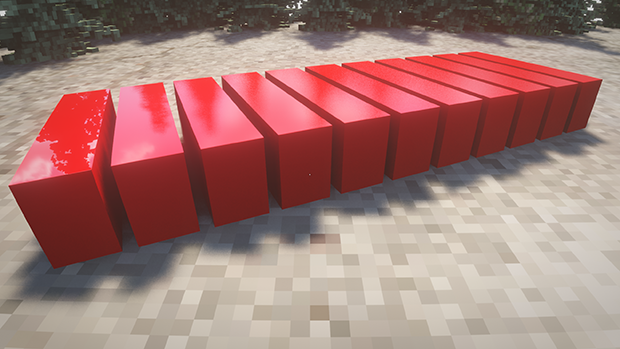
Roughness controls how polished vs dull a material look. With a 0 metallic value these materials look like they have a plastic characteristic, especially coupled with low roughness.
#### Metallic
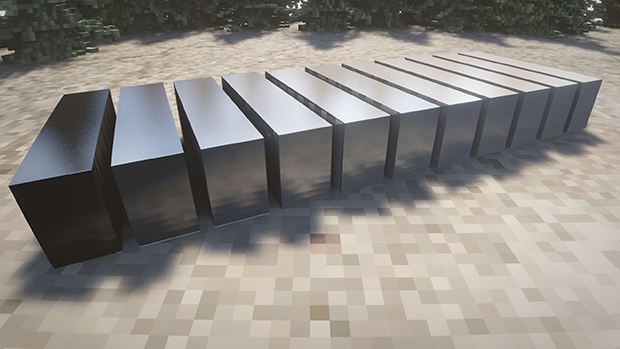
Metallic controls how metallic a material looks. Metallic materials tint the highlights with the materials color, but it also controls the reflectivity of the material. Overall in Teardown, only very low metallic values are ever used, and only for raw metal objects (objects where the actual metal surface is visible). For painted metal Metallic 0 should be used.
#### Metallic & roughness
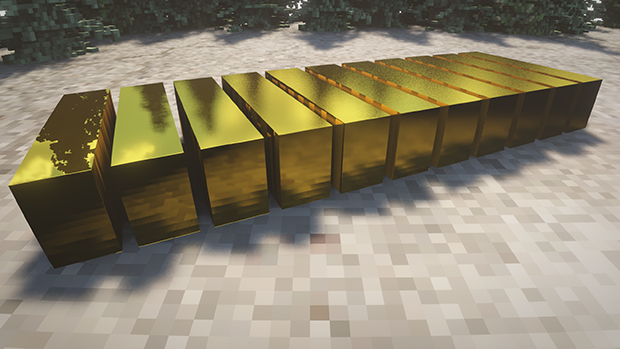
Combining metallic and roughness can result in very metallic looking materials. Comparing this image with the roughness image, you can see that the highlights in the orange material is tinted orange (due to it being metallic), while they are white in the red material.
#### Emission

Emissive materials are those which looks like they radiate light. However, emissive materials doesn't actually light up the scene, they only look like they radiate light. Emissive materials use the Emission value AND the Power value. The Power value must be at 2 or higher for the material to look emissive in the game.
#### Glass
For glass, two material properties are important; the transparency value and the value component of the color (in the HSV color model). The transparency value only matters whether it is 100 or any other value. All values from 0-99 are the same transparency. The image above would look the same even if the transparency value was 47, 28 or 65, but not 100. The value component (lightness/darkness) of the color affects how much of the color will tint the glass.
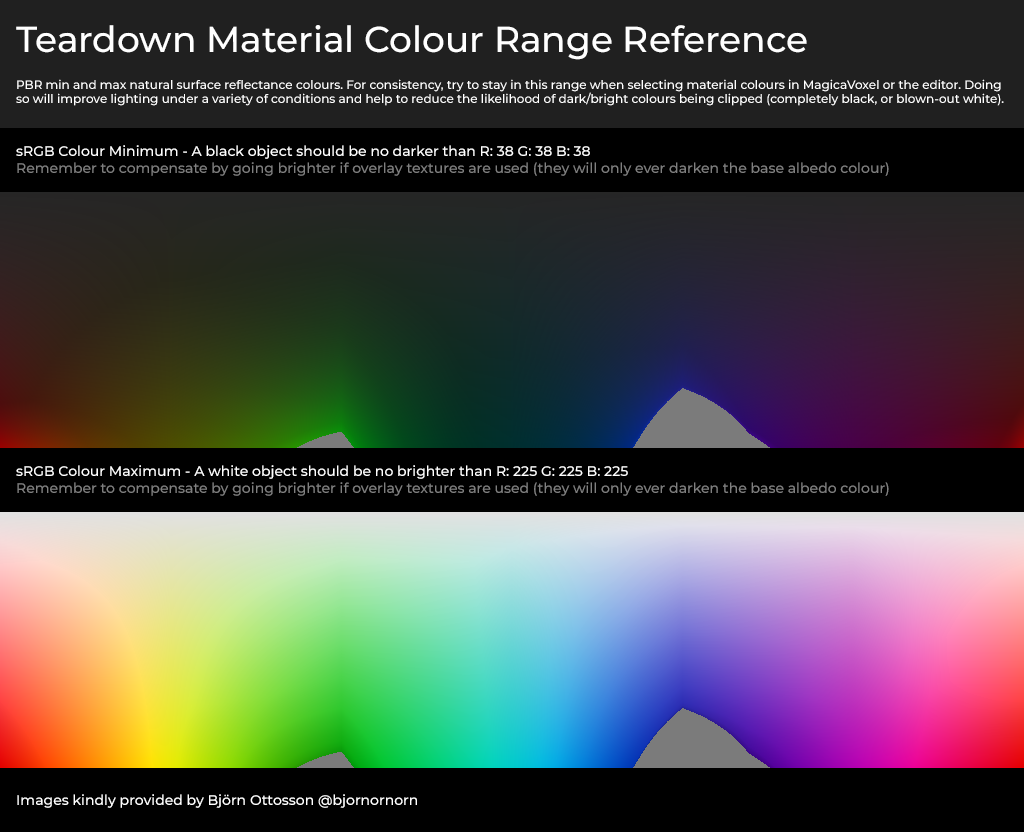
## Colours
Below are two guides to help you set up colours that work well with the Teardown engine.
## Custom skybox
To create a custom skybox for Teardown download [this](downloadable/skybox-dds.zip) tool and follow the instructions in readme.txt.
# Scripting
Scripting in Teardown can be used to change almost all aspects of the original gameplay. Scripting is used to add, extend or override existing behavior in the game. Teardown uses the Lua language for scripting. The game includes it's own Lua interpreter so no additional download or configuration is needed to start scripting. See [www.lua.org](https://www.lua.org/) for more information about Lua. The scripts used for the main game functionality can be found in the data/scripts folder in the teardown install folder. Take a look at these if you are interested in understanding more advanced scripting for Teardown.
## API Reference
The Teardown Lua API reference can be read [here](api.html)
The API Documentation is also available as an XML file, which can be downloaded [here](api.xml)
## Game Callback Functions
The Teardown mod scripts are called by the game using callback functions that are invoked from the main game and the game loop. A script can choose to implement one or more of the functions described below depending on purpose of the script.
During a game frame the `tick()` callback is called first. It is followed by zero, one or two calls to `update()` depending on frame rate. The `draw()` function is called once at the end of the frame. User input should be handled in `tick()` and never in `update()`. This is to avoid missing out or getting double input during a frame due to changes in the frame rate. The delta-time (`dt`) variable passed to `tick(dt)`, `update(dt)`, and `draw(dt)` contains the amount of time passed in the last rendered frame. This is usually used to scale effects in the game. Such as a body which should move 1 meter per frame should have its movement set to 1 * `dt`.
#### init()
The init function is called once and only once at load time. This is a good place to configure initial states and values.
#### tick(dt)
The tick function is called once per frame. The time step is variable but always between 0.0 and 0.0333333 seconds.
#### update(dt)
The update function is called at a fixed update rate, but at the most two times per frame. Time step is always 0.0166667 (60 updates per second). Depending on frame rate it might not be called at all for a particular frame.
#### draw(dt)
The draw callback function is called when the 2D overlay is being draw, after the scene but before the standard HUD. The API User Interface functions can only be used from this callback.
## Script Intercommunication
Scripts are usually self contained and does not require to call functions or pass data to other scripts. There are exceptions when a script needs to communicate with another script. This can be done through the registry.
#### Teardown Registry
The Teardown engine uses a global key/value-pair registry that scripts can read and write.
The registry is a hierarchical node structure and can store a value in each node.
Two nodes in the registry, `savegame` and `options`, are write protected and cannot be written to from mods.
Each mod has it´s own `savegame.mod` where it can store persistant data.
The Teardown registry can be used as a means to pass data between scripts. Data written by one script can be read by another script.
Script A:
```lua
...
local score = 14
SetInt("Score", score)
...
```
Script B;
```lua
...
local score = GetInt("Score")
...
```
In the above example script A sets the registry key "Score" to the value 14 (the value of the local variable score). This is then read by script B which could be used, for example, to display the score on the hud.
See the [Lua API reference](api.html) for more information on the registry functions.
## Scripting Video Tutorials
Below is a playlist of 10 videos covering the basics of scripting for Teardown.
Teardown scripting Youtube tutorial playlist
Direct links to the different parts:
1. Scripting Basics
2. Entities and Handles
3. Input and Interaction
4. Vector Math
5. Bodies and Shapes
6. User Interface
7. Multiple scripts and the registry
8. Scene queries
9. Sprites, sound and particles
10. Advanced topics
## Vox-script
Vox-scripts can be used to create voxels in the game programmatically at level build time. Documentation for the vox-scripts can be found [here](voxscript.html).
## Possibilities and Limitations
The Teardown modding platform is relatively new. We are continuously adding functionality that we need ourselves to develop the game but also functionality requested by the modding community.
Below is a list of current known limitations and some viable workarounds.
#### Object Spawn
It is currently not possible to spawn new objects at run time.
If you want to introduce "new" objects during gameplay your best option is to hide the objects out of sight from the user, maybe under the map. When the item is "spawned" the item is moved from it's hidden position under the map to it's "spawn" location.
#### Water level
The position of a water node can not be changed during run time. So high and low tide can't be simulated dynamically in the game.
# Teardown Links
Teardown Web Site - https://www.teardowngame.com/
Teardown Modding Information - https://www.teardowngame.com/modding/
Teardown Lua API - https://www.teardowngame.com/modding/api.html
Teardown Lua XML - https://www.teardowngame.com/modding/api.xml
Teardown Steam Workshop - https://steamcommunity.com/app/1167630/workshop/
Teardown Modding Tutorials - https://www.youtube.com/playlist?list=PLIVn6BiXBsLSqTnirA32VqHVVqWQMHTKP
Teardown Scripting Tutorials - https://www.youtube.com/playlist?list=PLFDYx1brPkKRhqEFTzZvU8yx5piF-50AY
Teardown Official Discord - https://discord.gg/teardown
 Teardown scripting Youtube tutorial playlist
Direct links to the different parts:
1. Scripting Basics
2. Entities and Handles
3. Input and Interaction
4. Vector Math
5. Bodies and Shapes
6. User Interface
7. Multiple scripts and the registry
8. Scene queries
9. Sprites, sound and particles
10. Advanced topics
## Vox-script
Vox-scripts can be used to create voxels in the game programmatically at level build time. Documentation for the vox-scripts can be found [here](voxscript.html).
## Possibilities and Limitations
The Teardown modding platform is relatively new. We are continuously adding functionality that we need ourselves to develop the game but also functionality requested by the modding community.
Below is a list of current known limitations and some viable workarounds.
#### Object Spawn
It is currently not possible to spawn new objects at run time.
If you want to introduce "new" objects during gameplay your best option is to hide the objects out of sight from the user, maybe under the map. When the item is "spawned" the item is moved from it's hidden position under the map to it's "spawn" location.
#### Water level
The position of a water node can not be changed during run time. So high and low tide can't be simulated dynamically in the game.
# Teardown Links
Teardown Web Site - https://www.teardowngame.com/
Teardown Modding Information - https://www.teardowngame.com/modding/
Teardown Lua API - https://www.teardowngame.com/modding/api.html
Teardown Lua XML - https://www.teardowngame.com/modding/api.xml
Teardown Steam Workshop - https://steamcommunity.com/app/1167630/workshop/
Teardown Modding Tutorials - https://www.youtube.com/playlist?list=PLIVn6BiXBsLSqTnirA32VqHVVqWQMHTKP
Teardown Scripting Tutorials - https://www.youtube.com/playlist?list=PLFDYx1brPkKRhqEFTzZvU8yx5piF-50AY
Teardown Official Discord - https://discord.gg/teardown
Teardown scripting Youtube tutorial playlist
Direct links to the different parts:
1. Scripting Basics
2. Entities and Handles
3. Input and Interaction
4. Vector Math
5. Bodies and Shapes
6. User Interface
7. Multiple scripts and the registry
8. Scene queries
9. Sprites, sound and particles
10. Advanced topics
## Vox-script
Vox-scripts can be used to create voxels in the game programmatically at level build time. Documentation for the vox-scripts can be found [here](voxscript.html).
## Possibilities and Limitations
The Teardown modding platform is relatively new. We are continuously adding functionality that we need ourselves to develop the game but also functionality requested by the modding community.
Below is a list of current known limitations and some viable workarounds.
#### Object Spawn
It is currently not possible to spawn new objects at run time.
If you want to introduce "new" objects during gameplay your best option is to hide the objects out of sight from the user, maybe under the map. When the item is "spawned" the item is moved from it's hidden position under the map to it's "spawn" location.
#### Water level
The position of a water node can not be changed during run time. So high and low tide can't be simulated dynamically in the game.
# Teardown Links
Teardown Web Site - https://www.teardowngame.com/
Teardown Modding Information - https://www.teardowngame.com/modding/
Teardown Lua API - https://www.teardowngame.com/modding/api.html
Teardown Lua XML - https://www.teardowngame.com/modding/api.xml
Teardown Steam Workshop - https://steamcommunity.com/app/1167630/workshop/
Teardown Modding Tutorials - https://www.youtube.com/playlist?list=PLIVn6BiXBsLSqTnirA32VqHVVqWQMHTKP
Teardown Scripting Tutorials - https://www.youtube.com/playlist?list=PLFDYx1brPkKRhqEFTzZvU8yx5piF-50AY
Teardown Official Discord - https://discord.gg/teardown